
Up until now it has all been about the sweet tooth, nothing about my other specialty, meat. Sarah and I have distinct talents, mine are around fiddly cakes, precision cooking and the ultimate meats and Sarah’s is everything else – amazing roasties, cracking slow cooked chicken and al dente vegetables. It really is a marriage made in heaven as we both have jobs to do in the kitchen, especially when it comes to a dinner party.
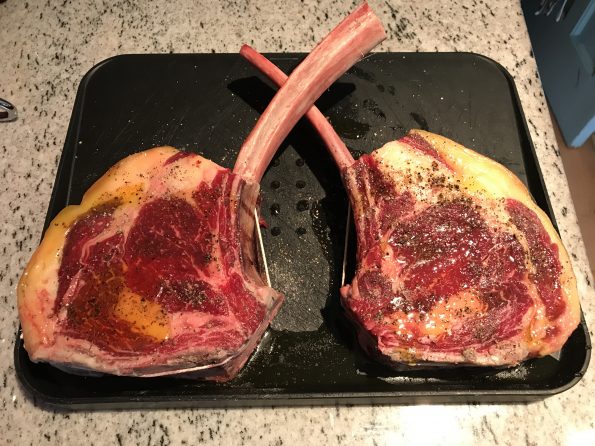
Recently we had a dinner party and on the run up to that party both Sarah and I were searching for a new normal. We love a good dinner party with wine flowing and laughing over a shared experience, creating memories and hangovers in equal measure. Last year was all about Big Green Egg experiments (which I’ll post about in the coming months) – slow cooked lamb, forerib of beef, salt baked celeriac and other yummy food. However, your guests never want to be eating the same thing, otherwise apart from the stimulating chat, they don’t get anything from the evening. So, in the new local butcher’s in Bishop’s Stortford we found our inspiration – tomahawk steaks! They are an impressive cut of meat and something that I’d never cooked.
So, when the inspiration struck it was Sunday and what better way to close the weekend out by having some lovely meat with your wife, while experimenting ahead of the following weekend’s dinner party. I’ve learnt that it is always good to experiment before 4-8 dinner guests descend into your home, I thrive on stress, but there’s no easier way of ruining a great friendship by keeping them waiting until midnight as you’ve not practiced! So, that’s what I did.
First thing I personally do when getting a new cut of meat, or in the search of a recipe is to take to Google and have a look around for something that resonates. On searching, I came across a very accomplished cook Jess Pryles who’s a self confessed Hardcore Carnivore and has an exceptional understanding of meat, the cuts and how to look after them while cooking. Originally from Australia she now lives in Austin, Texas where a lot of her influences come from. Her approach to cooking Tomahawk steaks using an indirect method is the approach that really suits me as an accomplished BBQer and slow cooker, so that’s what I cover here.
So, the approach with indirect cooking is different to normal BBQing where you light the flame directly under the meat and in some cases cremate the meat. Indirect heat is all about heating the meat, but from flames that aren’t in contact with the meat – the flames are used to create the temperature inside the BBQ, which indirectly cooks the meat. This method allows you to really control the cooking of the meat and ensure the fat doesn’t render too quickly, catch fire and leave the meat a charred mess. It is an approach that is best enjoyed with a glass of something cold and when you’re not in a rush. For this reason, it is always good to start it with an hour or so before you plan to eat. Any time left over can be used to rest the meat to make it easy to carve and to enhance the flavours.
THE SETUP
Ahead of placing on the BBQ, the most important thing is to get the steaks out of the fridge in good time and up to temperature. You can flavour with and marinade with lots of different things, but for me it is the simple flavours that are the best and don’t mask the taste of the meat. A glug of oil (I use rapeseed, but you can use olive oil, or whatever you’ve got open) and a good helping of salt and pepper on both sides of the steak is my perfect go to seasoning.
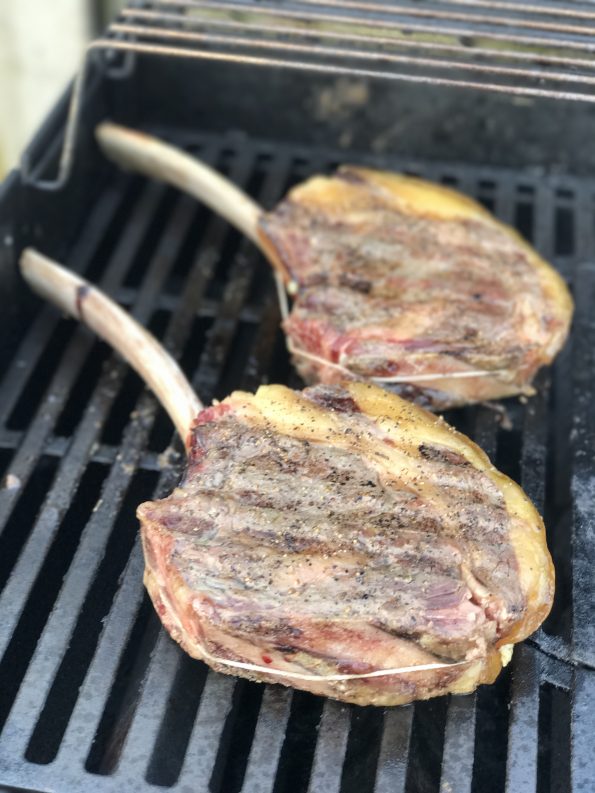
Place the steaks on an area of the BBQ that won’t come in contact with a flame – you can achieve this using gas, or coal BBQs. Depending on how many steaks you’re cooking, you may need a bigger BBQ, or you might simply cook the meat in phases. Personally, I’m lucky to own a Weber grill that allows for 2-6 Tomahawk steaks to be cooked at the same time without coming into contact with a flame.
THE COOK
So, when you’ve placed your steaks onto the BBQ ensuring they’re away from direct heat, light up the other side of the BBQ and close the lid. The advice I followed from Jess was to make sure you flip the meat often, about every 5 minutes or so to avoid any overcooking of one part of the meat. I have a good pair of OXO tongs to help with this, or recently I purchased some heatproof gloves that allow you to grab the bones and turn, great for unleashing your inner caveman!
Once 15 minutes or so has passed, you want to start to look carefully at what the inner temperature of the meat is doing. For this you’ll need a meat thermometer, I have 2-3 of these including one that allows me to monitor the meat remotely and to scream at me if the meat has hit approaching a set temperature threshold. For this cook you don’t need anything fancy, just one on a wire with an instant read out is what you’re looking for.
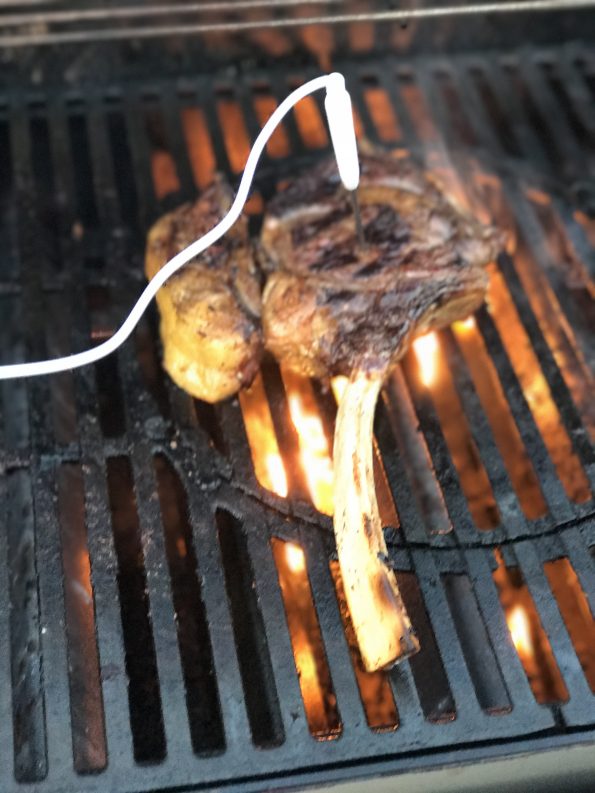
The temperature for medium rare is what you’re looking for and is between 130-135F (55-57C). The very centre of the meat will be the last to heat up and the outer edges are likely to be 10-20F hotter. With the Tomahawk, the fact you have meat at different temperatures isn’t a bad thing, as when you carve the meat people can grab from the platter what they like – everyone is different.
Now where I vary from Jess, because of the way I like to manage stress at dinner parties, is that I don’t rest the meat ahead of the sear. I prefer to rest the meat at the end of the cook because it makes plating up less stressful so it isn’t happening all at once. As long as you have super hot plates for the guests and a lovely gravy, the slightly cooler meat is great.
THE RENDER & THE SEAR
So when the meat is about 110-110F (38-43C) you want to start rendering some of the lovely fat down a bit so it becomes crispy.
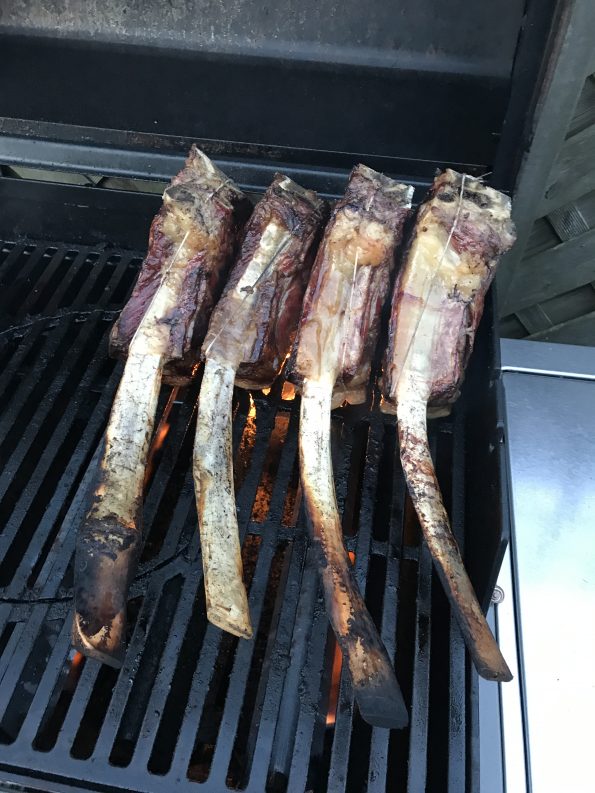
I cook the fat by leaning the pieces of meat up against each other and leaving the lid of the BBQ up. This way you create a really controlled cooking environment and can crisp up the fat without going too far.
The final bit, while keeping a keen eye on the temperature, is to colour up the outside of the by searing the meat over direct heat. You want a lovely grilled look to the meat, while not going into the cremation spectrum of colours! Once there and the temperature has been reached, bang onto a carving board to rest and get ready for the plaudits (not a massive fan of attention, but after you’ve spent an hour or so cooking, you at least want the feedback – good or bad). Obviously bonus marks for your own engraved board (thank you Sarah!).
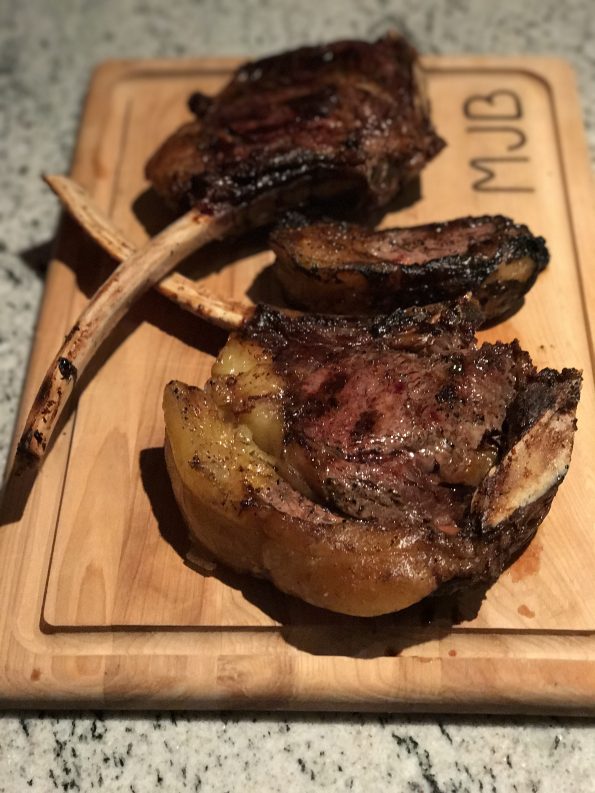
Depending on what else you’re plating the meat with, you can leave the meat to rest for 20-30 minutes, but never less than 10. Make sure you wrap the meat in tin foil to keep as much of the heat as possible.
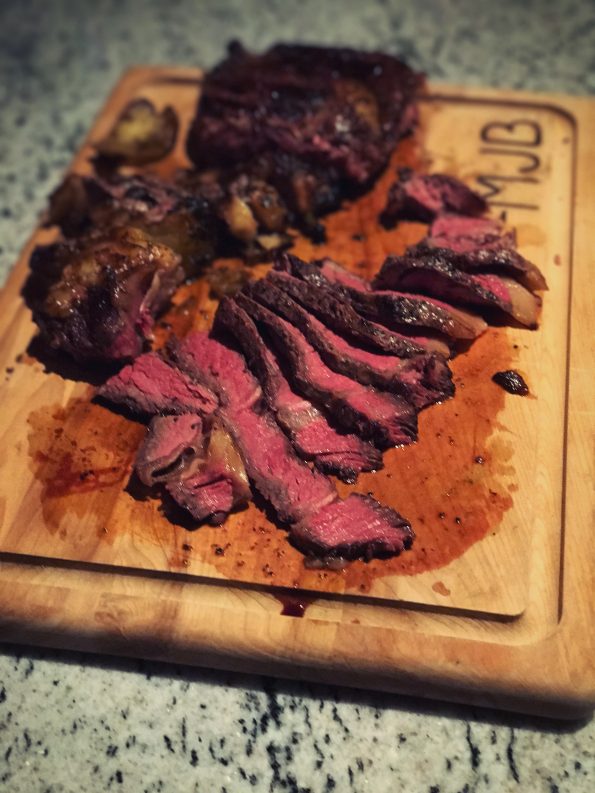
The carve
Grab a super sharp knife and something to keep the meat in place when you slice it into juicy pieces – a fork is fine. The colour you’re looking for is pink in the middle and nicely brown around the edges. The only advice left to give is make sure you get in there before anyone else does, there’s nothing like the first piece from the middle of the steak ahead of unleashing the starving guests on it!
As usual, would love to hear how you get on. It turned out for us that the dry run for the dinner party was a great way of lowering the stress levels for the following weekend. Life is best when you spend it with friends, creating shared memories.

Oh my goodness looks great!!!! Wow. Hungry now!!! Keep posting!!